Adding Users
Staff members need to be added to the list of individuals in an office in order to access CounselLink. Once created, the users will use a unique login to access the system. Then, you can attach roles to that user that grant them specific permissions.
NOTE You must have the User Admin role to add a user.
Adding a User
-
You can access the Create New User page by these ways:
-
From Corporate Profile
- Navigate to the Corporate Profile page.
- Click on the plus sign (+) for the Office where the new user will be added.

- Click Add User from the QuickLinks column on the left side of the screen. The Search for Duplicate User Profile screen displays.

NOTE This process is used to ensure that the person being added does not already exist in CounselLink.
- Enter information into the fields.
- Click Search.
- If no individuals were found, click Add New Individual. The Create New User Profile page displays.
The office selected will display as the profile at the top of the page.

-
From User Search
-
Click the User Search tab at the top of the page.
-
Click the +Add User button.

The Create New User Profile Page displays.
-
-
From Administration Panel
-
Click the Add User button in the Administration Panel on the homepage.
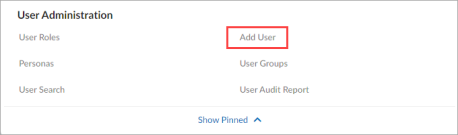
The Create New User Profile Page displays.
-
-
-
 In the User Information section, provide the required information.
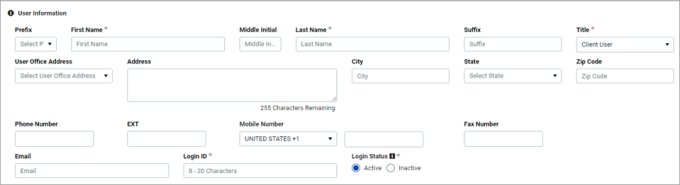
NOTE Fields marked with an asterisk (*) are required.
- In the Prefix list, choose a courtesy title such as Mr. or Mrs.
- In the First Name box, type the first name of the individual.
- In the Middle Initial box, type the middle name of the individual.
- In the Last Name box, type the last name of the individual.
- In the Suffix box, type the ending of the individual's name or academic suffixes if desired.
- In the Title list, choose the title that best describes the individual's position in the office.
- In the Email box, type the address CounselLink should use to notify the user of events.
- In the Login ID box, type the characters used to log into CounselLink. The password will be provided later.
-
In the User Office Address list, choose the office where the user will need to have access to matters or invoices. This will be the user’s primary CounselLink Office.
- In the Address, City, State, and Zip Code boxes, type an address for the individual.
- In the Phone boxes, type the office phone number.
- In the Mobile box, enter the mobile phone number.
- In the Fax boxes, type the fax phone number.
NOTE If your company has internal guidelines for login IDs, follow those guidelines. If your organization is configured for SSO, an additional SSO ID field will appear under the Login ID box.
-
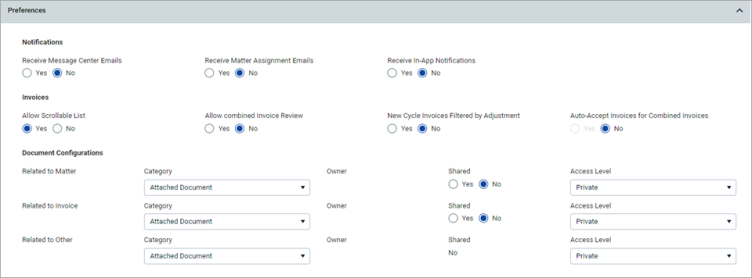
In the Preferences section, provide the following information:
If you'd like, you can use the defaults in this section for the user to configure on their own.
NOTE Fields marked with an asterisk (*) are required.
- In the Receive Message Center Emails field, the No option is selected by default. Select Yes is you wish for the user to receive emails from the message center.
- In the Receive Matter Assignment Emails field, the Yes option is selected by default. Select No if you do not want the user to receive Matter Assignment emails.
- In the Allow Scrollable List for Invoice field, select Yes to enable a scroll bar in the charges section on the Invoice Overview and Combined Invoice pages.
-
In the New cycle invoices filtered by adjustments field, select Yes to view only adjusted charges or No to see the entire invoice.
- In the Category list, select from one of the available options to categorize the document.
- In the Owner field, identify the name of the person who will be listed as the owner.
- In the Shared list, select the appropriate option. This field answers the question: "Should outside counsel be able to view this document?" The default setting is No. See chart below.
- In the Access Level list, select the appropriate option. Answers the question: "Which outsiders can view this document?" The default setting is Private.
NOTE See this topic for more information on document security.
-
In the Regional Settings section, provide the required information:

If you'd like, you can use the defaults in this section for the user to configure on their own.
NOTE
• Corporate or divisions can have their own settings that will apply to all if not already changed by the user.
• Fields marked with an asterisk (*) are required.- In the Short Date Format list, select the appearance of the shorter date used in invoices and searches (e.g. 07-21-2013).
- In the Long Date Format list, select the option that spells out the date (e.g. July 21, 2013).
-
In the Digits in a Group list, select how many numbers are grouped together in large numbers.
- In the Digits Grouping Symbol list, select the symbol to be used to separate number groupings.
- In the Decimal Symbol list, select the symbol used between the whole and fractional number.
- In the Example of Negative Number, select the format of the negative number.
- In the Time Format list, select the preferences for the 12 or 24 hour clock, and preferences for period or semi-colon separator.
-
In the Time Zone list, select the time zone for the user.
- In the Negative Currency Format list, select the option for use of parentheses or negative sign to indicate negative numbers.
- In the Currency Symbol Position list, select the position of the currency symbol.
- In the Display Currency ISO Code list, select the display of the ISO code or keep it hidden. USD is the code for US.
- The Example of Negative Currency field displays the format of the negative currency as defined.
-
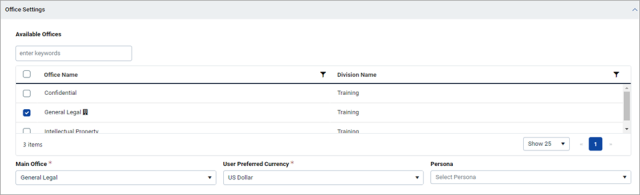
In the Office Settings section, choose which office(s) the individual should be assigned.
- To add a user to an Office, select the office(s) from Office Name column.
- To remove a user from an Office, select the office(s) from the Office Name column.
- Select a User Persona from the drop down list.
NOTE The User Persona feature must be enabled for your organization to have this option.
-
Next, under the six roles sections, choose the roles (access levels) for this user. If they will have a workflow role, be sure and give them a Matter or Invoice Authority Amount in the Invoice Roles section. For more information on roles, see Roles for Various Job Titles.
NOTE See this topic for more information on the different types of roles and their permission level.
-
Click Save.
Once a user has been added, they are sent a welcome email with login information.